在Android中实现状态栏与顶栏同色,可以增加应用的美观性,提升用户体验。那么这一点是如何实现的呢?
目前,比较常用的是github上一个叫做SystemBarTint 的库。但是在实际使用的过程中,当与碎总的SwipeBackLayout 滑动返回一起使用的时候,会发现通知栏并不能和当前页面一起被滑走,在StatusBar与ActionBar连接的地方会有很明显的撕裂感,非常影响用户体验。所以在我们自己的项目中放弃了这种实现方式并寻求其他解决方案,最终通过阅读SwipeBackLayout源码和SystemBarTint源码找到了解决方案,实现了状态栏和顶栏同色与滑动返回的完美结合。
首先我们通过SystemBarTint的源码分析来搞明白状态栏和变色是如何实现的
1
2
3
4
5
6
7
8
9
10
11
12
13
14
15
16
17
18
19
20
21
22
23
24
25
26
27
28
29
30
31
32
33
34
35
36
37
38
39
40
41
42
43
44
45
46
47
48
49
50
51
/**
* Constructor. Call this in the host activity onCreate method after its
* content view has been set. You should always create new instances when
* the host activity is recreated.
*
* @param activity The host activity.
*/
@TargetApi ( 19 )
public SystemBarTintManager ( Activity activity ) {
Window win = activity . getWindow ();
ViewGroup decorViewGroup = ( ViewGroup ) win . getDecorView ();
if ( Build . VERSION . SDK_INT >= Build . VERSION_CODES . KITKAT ) {
// check theme attrs
int [] attrs = { android . R . attr . windowTranslucentStatus ,
android . R . attr . windowTranslucentNavigation };
TypedArray a = activity . obtainStyledAttributes ( attrs );
try {
mStatusBarAvailable = a . getBoolean ( 0 , false );
mNavBarAvailable = a . getBoolean ( 1 , false );
} finally {
a . recycle ();
}
// check window flags
WindowManager . LayoutParams winParams = win . getAttributes ();
int bits = WindowManager . LayoutParams . FLAG_TRANSLUCENT_STATUS ;
if (( winParams . flags & bits ) != 0 ) {
mStatusBarAvailable = true ;
}
bits = WindowManager . LayoutParams . FLAG_TRANSLUCENT_NAVIGATION ;
if (( winParams . flags & bits ) != 0 ) {
mNavBarAvailable = true ;
}
}
mConfig = new SystemBarConfig ( activity , mStatusBarAvailable , mNavBarAvailable );
// device might not have virtual navigation keys
if (! mConfig . hasNavigtionBar ()) {
mNavBarAvailable = false ;
}
if ( mStatusBarAvailable ) {
setupStatusBarView ( activity , decorViewGroup );
}
if ( mNavBarAvailable ) {
setupNavBarView ( activity , decorViewGroup );
}
}
可以看到在27~31行通过条件判断首先设置statusbar为透明(只有Android4.4及以上的系统才可以设置statusbar为透明,这也是状态栏变色只在Android4.4及以上系统有效的原因),将statusbar设置为透明之后,statusbar下边的那一层黑条就不见了,当前页面的内容也就会顶到屏幕最上边了(statusbar和navigationbar其实是两个window)。接下来,我们再来看一段代码
1
2
3
4
5
6
7
8
9
10
11
12
private void setupStatusBarView ( Context context , ViewGroup decorViewGroup ) {
mStatusBarTintView = new View ( context );
LayoutParams params = new LayoutParams ( LayoutParams . MATCH_PARENT , mConfig . getStatusBarHeight ());
params . gravity = Gravity . TOP ;
if ( mNavBarAvailable && ! mConfig . isNavigationAtBottom ()) {
params . rightMargin = mConfig . getNavigationBarWidth ();
}
mStatusBarTintView . setLayoutParams ( params );
mStatusBarTintView . setBackgroundColor ( DEFAULT_TINT_COLOR );
mStatusBarTintView . setVisibility ( View . GONE );
decorViewGroup . addView ( mStatusBarTintView );
}
通过这一段代码可以看出,SystemBarTint通过给decorview add了一个和statusbar高度一样的view进去。
至此,我们应该知道SystemBarTint是如何实现状态栏变色的了,接下来我们再看看SwipeBackLayout的源码
首先,我们来看SwipeBackActivity这个类
1
2
3
4
5
6
7
8
9
10
11
12
13
14
15
16
17
18
19
20
21
22
23
24
25
26
27
28
29
30
31
32
33
34
35
36
37
38
39
public class SwipeBackActivity extends ActionBarActivity implements SwipeBackActivityBase {
private SwipeBackActivityHelper mHelper ;
@Override
protected void onCreate ( Bundle savedInstanceState ) {
super . onCreate ( savedInstanceState );
mHelper = new SwipeBackActivityHelper ( this );
mHelper . onActivityCreate ();
}
@Override
protected void onPostCreate ( Bundle savedInstanceState ) {
super . onPostCreate ( savedInstanceState );
mHelper . onPostCreate ();
}
@Override
public View findViewById ( int id ) {
View v = super . findViewById ( id );
if ( v == null && mHelper != null )
return mHelper . findViewById ( id );
return v ;
}
@Override
public SwipeBackLayout getSwipeBackLayout () {
return mHelper . getSwipeBackLayout ();
}
@Override
public void setSwipeBackEnable ( boolean enable ) {
getSwipeBackLayout (). setEnableGesture ( enable );
}
@Override
public void scrollToFinishActivity () {
getSwipeBackLayout (). scrollToFinishActivity ();
}
}
可以看到在14行的地方有一个mHelper.onPostCreate(),我们接着往下看
1
2
3
4
5
6
7
8
9
10
11
12
13
14
15
16
17
18
19
20
21
22
23
24
25
26
27
28
29
30
31
32
33
34
35
36
37
38
39
40
41
42
43
44
45
46
public class SwipeBackActivityHelper {
private Activity mActivity ;
private SwipeBackLayout mSwipeBackLayout ;
public SwipeBackActivityHelper ( Activity activity ) {
mActivity = activity ;
}
@SuppressWarnings ( "deprecation" )
public void onActivityCreate () {
mActivity . getWindow (). setBackgroundDrawable ( new ColorDrawable ( 0 ));
mActivity . getWindow (). getDecorView (). setBackgroundDrawable ( null );
mSwipeBackLayout = ( SwipeBackLayout ) LayoutInflater . from ( mActivity ). inflate (
me . imid . swipebacklayout . lib . R . layout . swipeback_layout , null );
mSwipeBackLayout . addSwipeListener ( new SwipeBackLayout . SwipeListener () {
@Override
public void onScrollStateChange ( int state , float scrollPercent ) {
}
@Override
public void onEdgeTouch ( int edgeFlag ) {
}
@Override
public void onScrollOverThreshold () {
}
});
}
public void onPostCreate () {
mSwipeBackLayout . attachToActivity ( mActivity );
}
public View findViewById ( int id ) {
if ( mSwipeBackLayout != null ) {
return mSwipeBackLayout . findViewById ( id );
}
return null ;
}
public SwipeBackLayout getSwipeBackLayout () {
return mSwipeBackLayout ;
}
}
可以发现在33行的位置有一个mSwipeBackLayout.attachToActivity(mActivity),我们接着看下去
1
2
3
4
5
6
7
8
9
10
11
12
13
14
15
16
public void attachToActivity ( Activity activity ) {
mActivity = activity ;
TypedArray a = activity . getTheme (). obtainStyledAttributes ( new int [] {
android . R . attr . windowBackground
});
int background = a . getResourceId ( 0 , 0 );
a . recycle ();
ViewGroup decor = ( ViewGroup ) activity . getWindow (). getDecorView ();
ViewGroup decorChild = ( ViewGroup ) decor . getChildAt ( 0 );
decorChild . setBackgroundResource ( background );
decor . removeView ( decorChild );
addView ( decorChild );
setContentView ( decorChild );
decor . addView ( this );
}
终于,我们找到了最初始的位置,通过这一段代码,我们会发现SwipeBackLayout的原理其实就是获取到当前页面的DecorView然后再获取到这棵view树位于0位置的view并将其移除,之后再把SwipeBackLayout(通过源码可以知道这个Layout是继承自FrameLayout的) add到DecorView里边来。
综合分析了SystemBarTint和SwipebackLayout的源码之后,我们也就知道为什么statusbar不能一起划走的原因了,因为SystemBarTint是给DecorView add了一个和statusbar同高的view,而SwipeBackLayout也是DecorView的子view,这两个view在同一层次上,所以不能一起滑走。知道原因之后,解决方案也就浮出了水面,我们可以在把那个view add到SwipwBacklayout里边来,这样子就可以一起滑走了。下面代码是我们项目里边的实现方式
1
2
3
4
5
6
7
8
9
10
11
12
13
14
15
16
17
18
19
20
21
22
23
24
25
26
27
28
29
30
31
32
@TargetApi ( Build . VERSIONCODES . KITKAT )
protected void setSystemBarTransparent () {
Window window = getWindow ();
WindowManager . LayoutParams layoutParams = window . getAttributes ();
layoutParams . flags |= WindowManager . LayoutParams . FLAGTRANSLUCENTSTATUS ;
if ( immerseNavigationBar () && ! SmartBarUtils . isMeizu ()) {
layoutParams . flags |= WindowManager . LayoutParams . FLAGTRANSLUCENTNAVIGATION ;
}
window . setAttributes ( layoutParams );
if ( shouldHackStatusBarTransparent ()) {
hackStatusBarTransparent ();
setContentPadding ();
}
}
protected void setContentPadding () {
int actionBarHeight = mHasActionBarHeight ? CommonUtils . getActionBarHeight ( this ) : 0 ;
(( ViewGroup ) findViewById ( android . R . id . content )). getChildAt ( 0 ). setPadding ( 0 ,
CommonUtils . getStatusBarHeight ( this ) + actionBarHeight , 0 , 0 );
}
protected void hackStatusBarTransparent () {
Window window = getWindow ();
ViewGroup contentFrame = ( ViewGroup ) window . getDecorView (). findViewById (
android . R . id . content );
View hackView = new View ( this );
setStatusViewBackground ( hackView );
contentFrame . addView ( hackView , ViewGroup . LayoutParams . MATCHPARENT ,
CommonUtils . getStatusBarHeight ( this ));
}
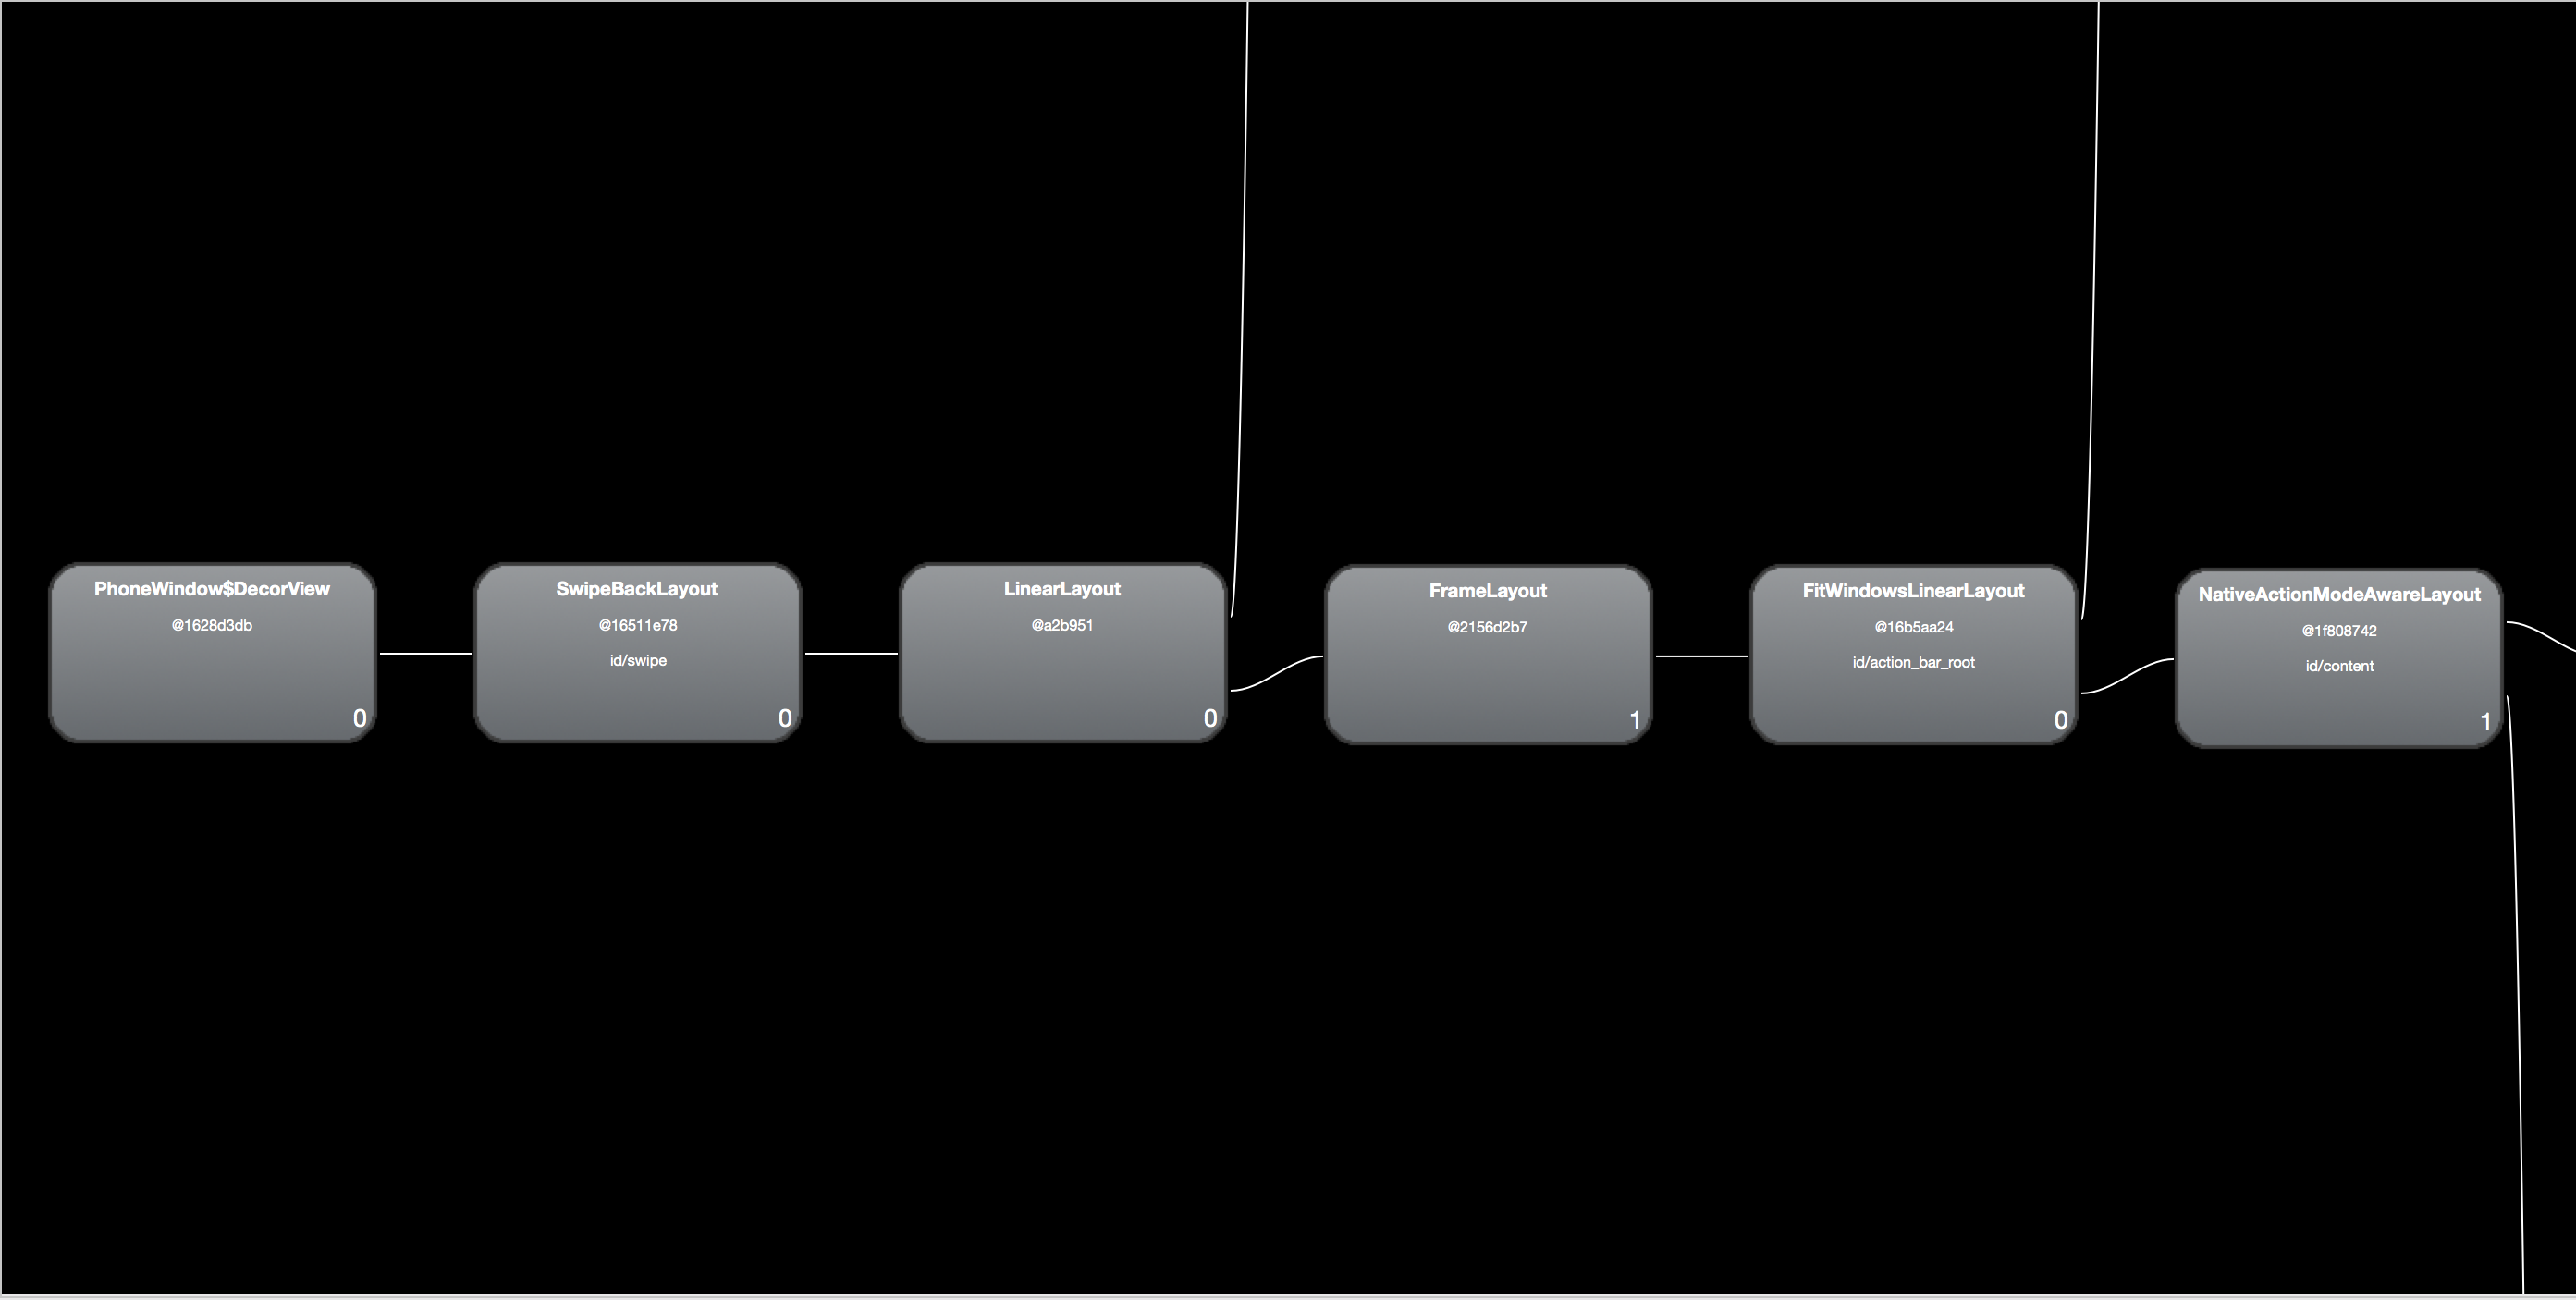
最后通过hierarchyviewer工具load出来一个view布局很容易看明白这个问题,截图如下